How to Setup SSO using Okta
Single Sign-On (SSO) is a user authentication process that allows your users to sign in to multiple applications using the same set of login credentials. This allows ease of use for the end users and ease of management. VIDIZMO offers the most flexible options for you to integrate with a wide range of single sign-on authentication providers, including:
- Directory services such as Azure AD etc.
- Identity Access Management (IAM) services such as Okta, OneLogin, Ping, Centrify,
- Third-party login services such as Facebook, Google, Office 365, X(Twitter), LinkedIn, etc.
With an app model integration for SSO, VIDIZMO makes the integration as easy as enabling/disabling your identity provider from within the platform administrator interface in minutes. Enterprises using Okta as their identity provider can utilize SSO option with VIDIZMO, allowing users to sign in using the same set of credentials.
For more information about VIDIZMO SSO Apps, read Understanding Single Sign-On.
Before You Start
- Okta Developer Account: You must have an active Okta developer account to create an application. Sign up here.
- VIDIZMO Portal: Ensure that you belong to a group where the Management of SSO + SCIM permission is enabled to access this feature.
- Additional SSO Apps: If more SSO Apps have been configured and enabled on your Portal other than Okta SSO, your users will see multiple buttons on the login page allowing them to choose any identity provider of their choice to log in to their VIDIZMO Portal.
- Required Scopes: Ensure the following scopes are exposed by your Okta authorization server:
- Profile (The user's First Name and Last Name are exposed and mapped in your VIDIZMO account in this Scope)
- Email (The user's Email Address is exposed and mapped in your VIDIZMO account in this Scope)
- Phone (The user's Phone Number is exposed and mapped in your VIDIZMO account in this Scope)
- Groups (This is a custom Scope that must be exposed by your Authorization Server. See Adding Custom Scope and Claim to read how to configure it)
- Security Considerations: Enable HTTPS in your VIDIZMO portal, see: How to Configure your Portal to use HTTPS
Configuration in Okta
Creating a New Application in Okta
Firstly, you are required to create an application in Okta in order to configure Okta SSO in VIDIZMO. Following steps show you how to create an application in Okta:
1. Go to Okta.com and sign up for an Okta account if you don't have one.
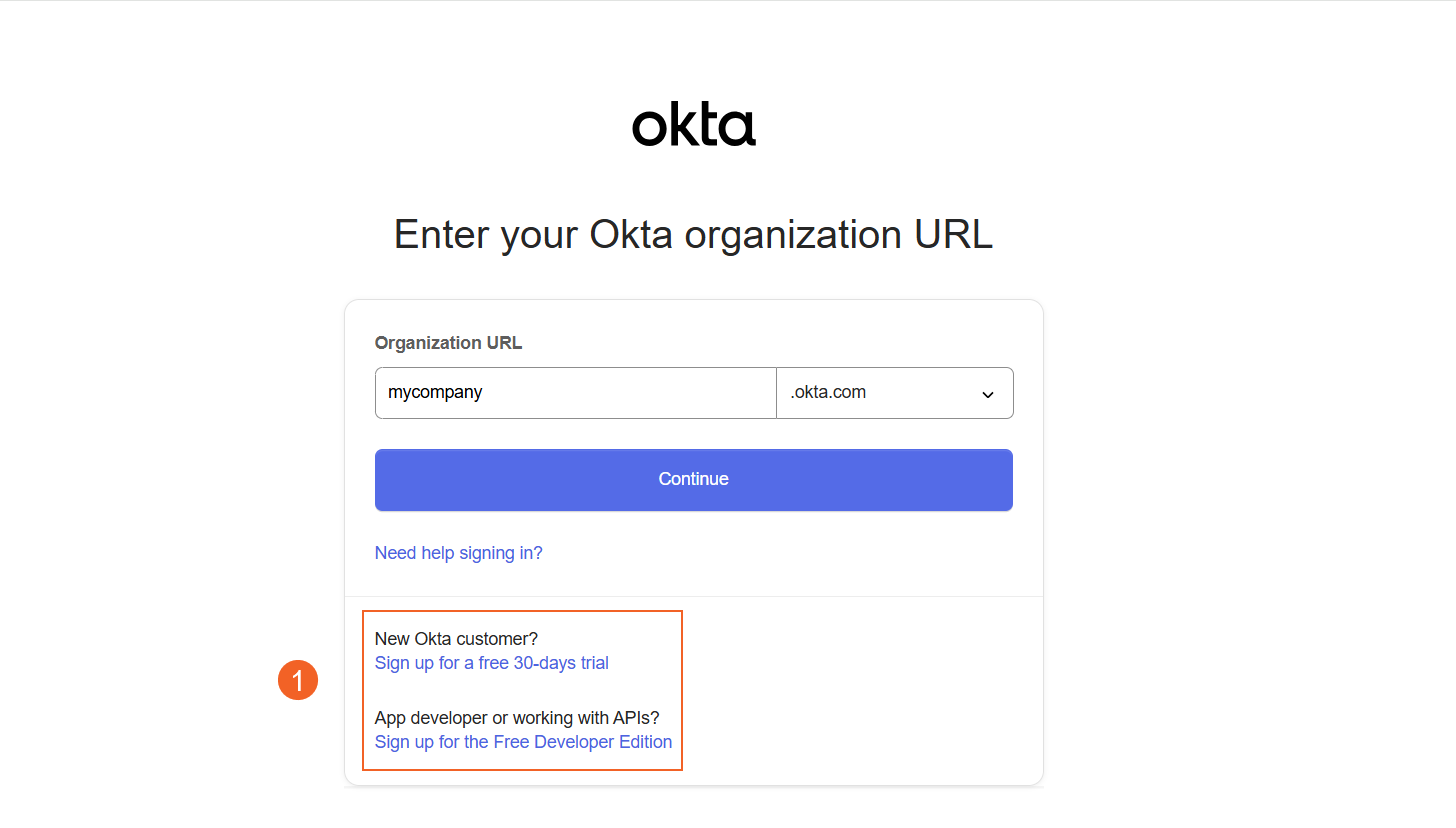
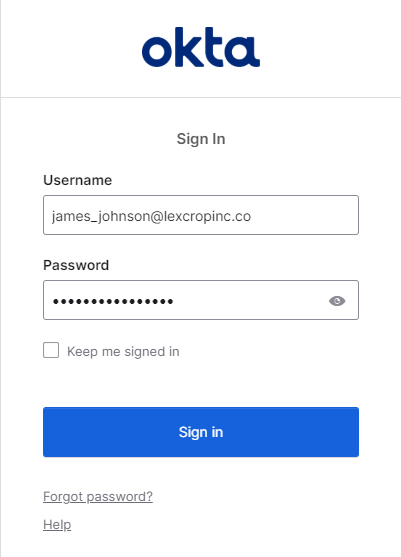
2. Enter your ORG URL that you received via email while creating your Okta account. At the Sign In page:
i. Enter your email address and password.
ii. Select Sign In.
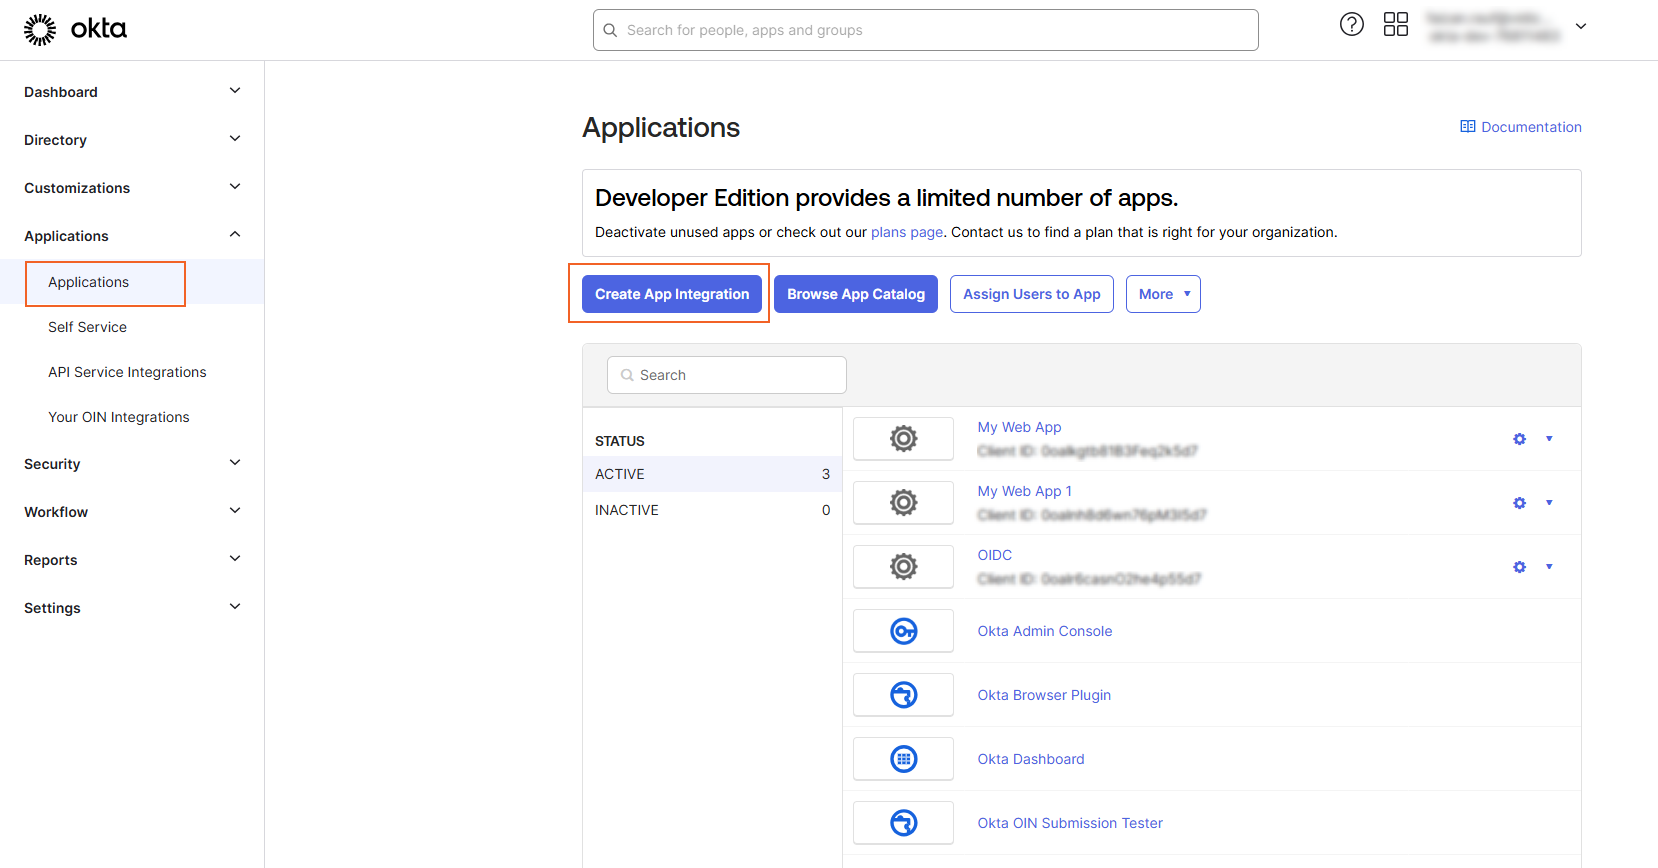
3. From the Developer's Dashboard, select Applications.
i. Navigate to Applications in Okta Dashboard.
ii. Select Create App Integration.
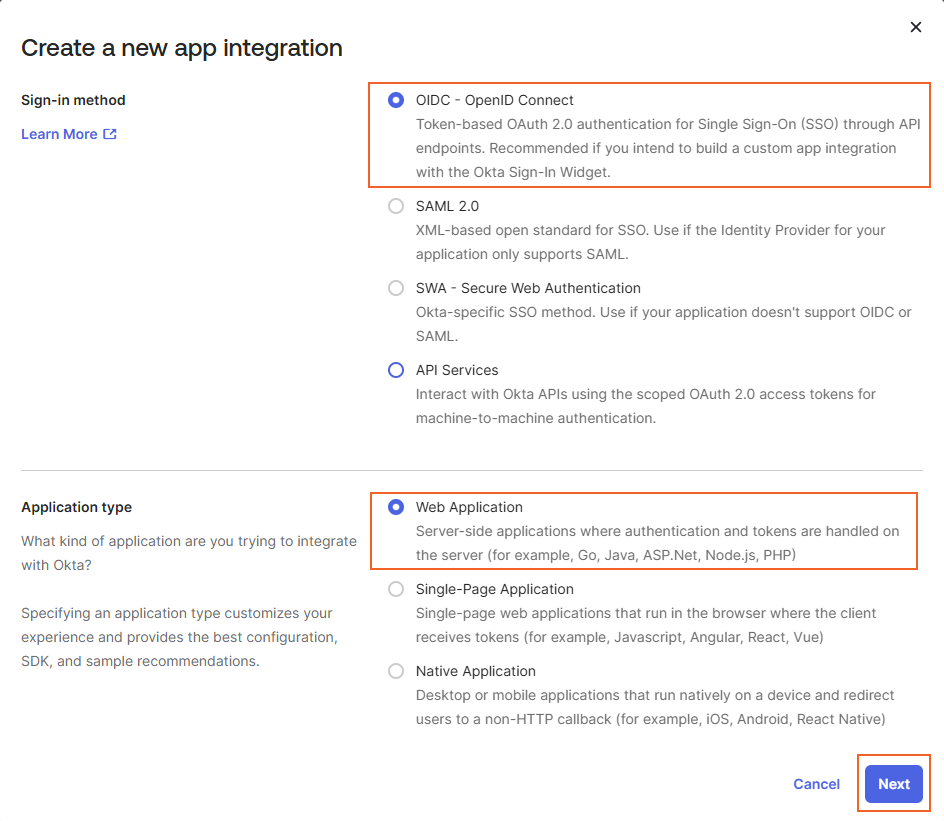
4. From the Create a new app integration page:
i. Select the Sign-in Method: Choose OIDC - OpenID Connect.
ii. Choose Application Type: Web Application.
iii. Select Next.
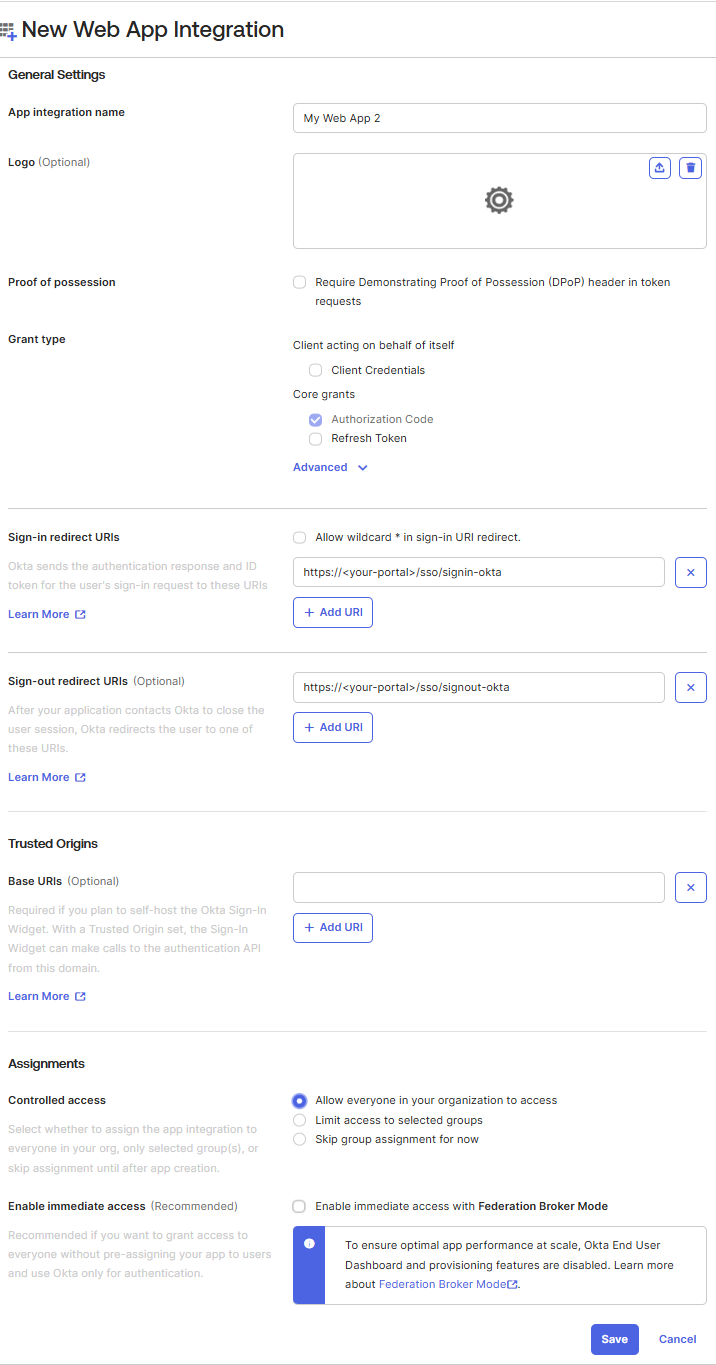
5. From the New Web App Integration page:
i. Specify the Name of the Application.
ii. Add the logo (Optional).
iii. Select the Grant Type (Optional).
iv. Specify the following URIs:
- Sign-In Redirect URI: Enter the URI of your portal followed by
/sso/signin-oktato specify the endpoint for successful user sign-ins. Example:https://<your-portal>/sso/signin-okta - Sign-Out Redirect URI: Enter the URI of your portal followed by
/sso/signout-oktato define the redirect URI where Okta will send users after they sign out. Example:https://<your-portal>/sso/signout-okta
v. Enter Base URIs (Optional).
vi. In Assignment section you can grant the access as per your requirement.
vii. Select Save to create the application.
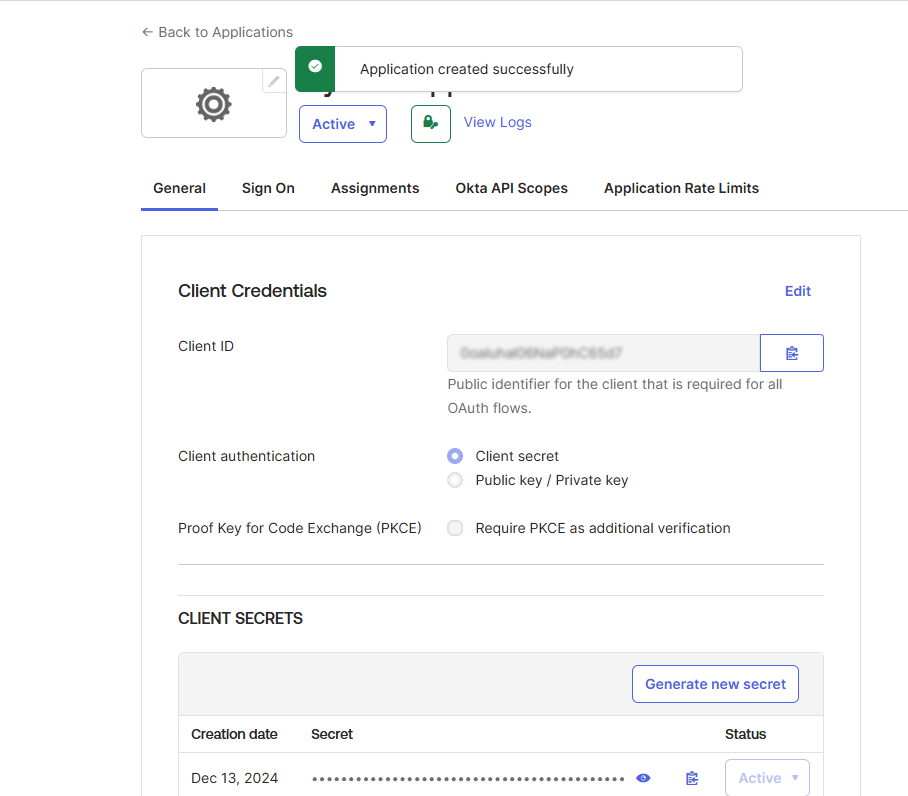
You will be directed to your created application:
Assigning Users and Groups Within the Application
To allow users and groups to sign in using Okta credentials:
- Navigate to the created application's Assignments tab.
- Expand Assign to.
- Select Assign to People or Assign to Groups depending on whom you wish to assign the created application.
- Search and select the relevant users or groups and select Done.

Groups assigned in the Okta application will automatically sync with the VIDIZMO portal, provided that SSO (Single Sign-On) is enabled.
Once you've assigned the application to relevant users and groups, you can move on to the next section.
Adding Custom Scope and Claim
By default, Okta's authorization servers expose a number of scopes during user authentication that allow VIDIZMO to map user information from your identity provider to VIDIZMO. As VIDIZMO synchronizes your Okta groups to your VIDIZMO Portal, it is required that you add a custom Scope named groups in the list of scopes exposed by your authorization server. To know more about Scopes and Claims in Okta, read Key Concepts: Scopes, Claims and, Response Types.
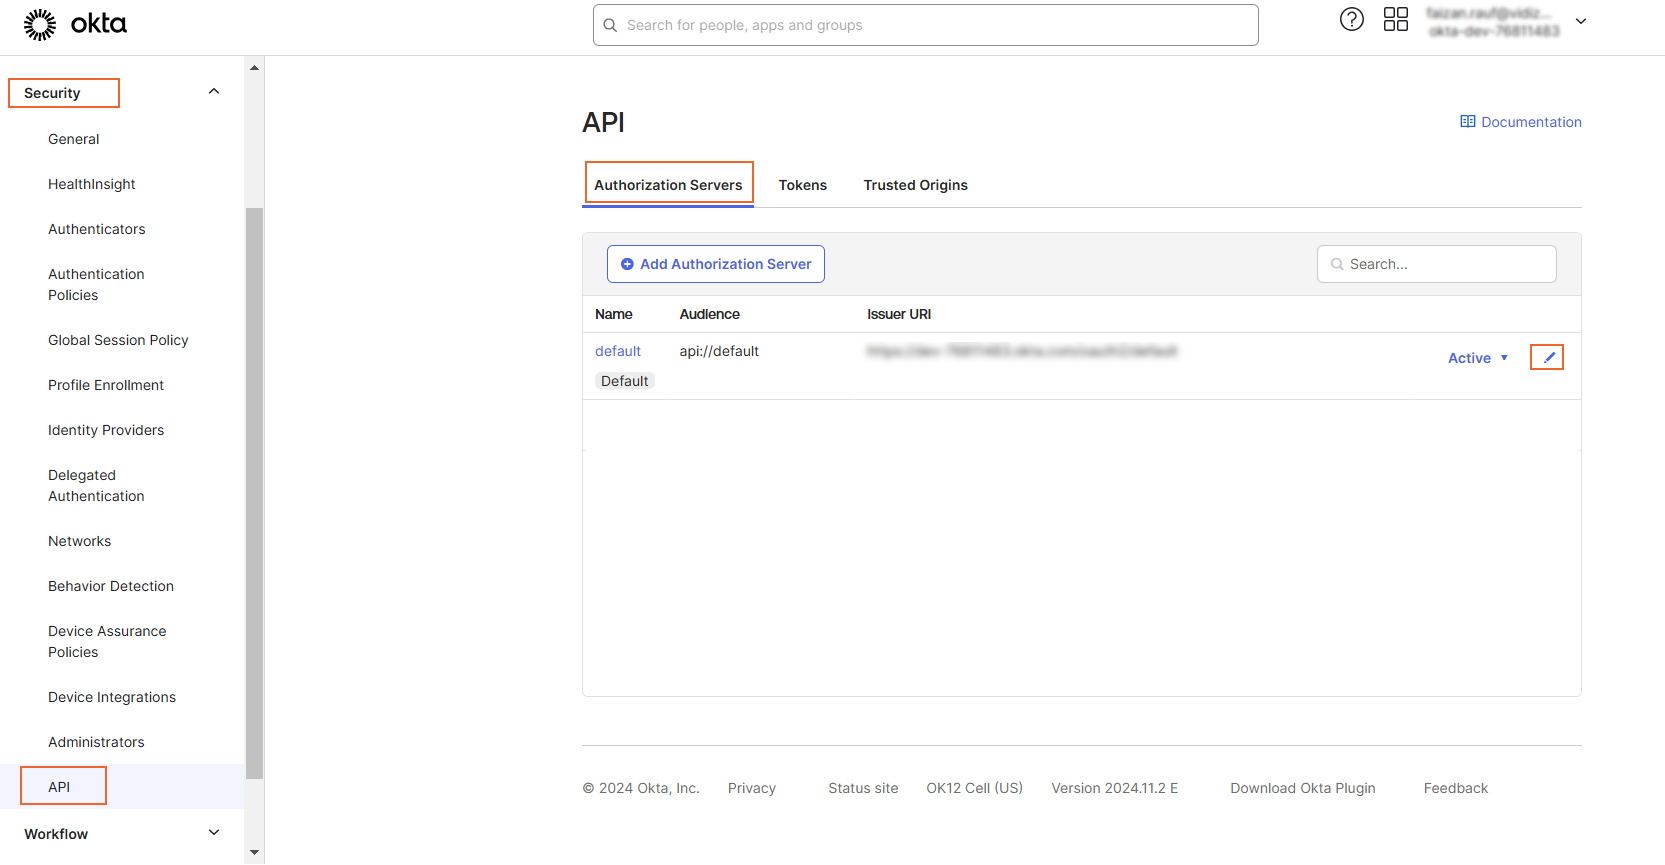
- Navigate to Security and select API.
- Under the Authorization Servers tab, locate the default server and select Edit.
Add Scope:
To synchronize Okta groups with VIDIZMO, add a custom scope by following the steps:
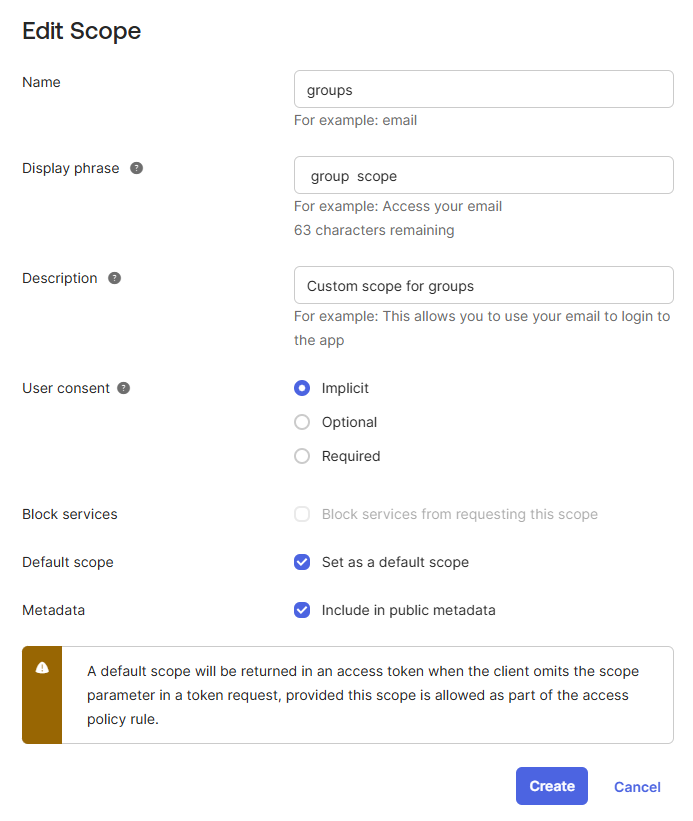
- Navigate to the Scopes tab and select Add Scope.
- A popup Add Scope appears:
i. Specify the Name for the scope as groups.
ii. Enter a relevant Display phrase as shown.
iii. Enter a relevant Description as shown.
iv. Enable Options User Consent, Default Scope and Metadata.
v. Select Create to add the Scope.
Add Claim:
- Navigate to the Claims tab and select Add Claim.
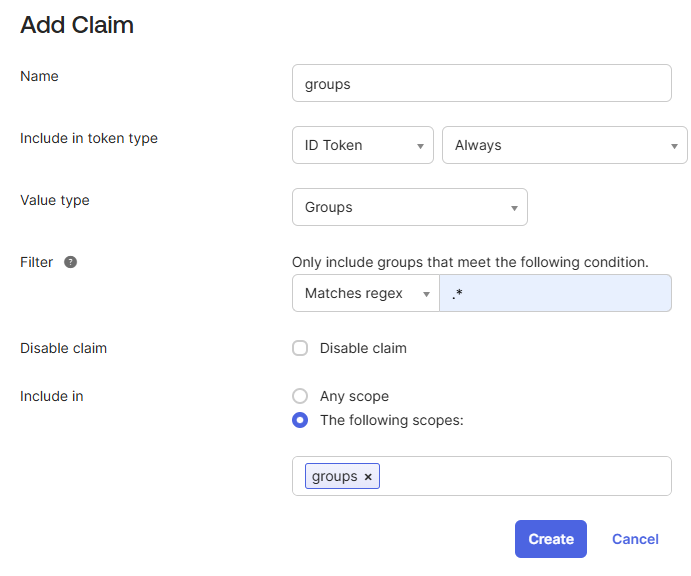
- A popup Add Claim appears:
i. Specify a Name for the Claim.
ii. Specify Include in token type as ID Token and Always.
iii. Select the Value type as Groups from the dropdown.
iv. For Filter, select Matches regex and specify .* as the condition.
v. Specify the groups scope as created in the previous section under the Include in attribute.
- Select Create to add the claim.
Once done, you'll be able to see the created claim in the list:

Creating Access Policies
Under the Authorization Servers tab, locate the default server and select Edit.
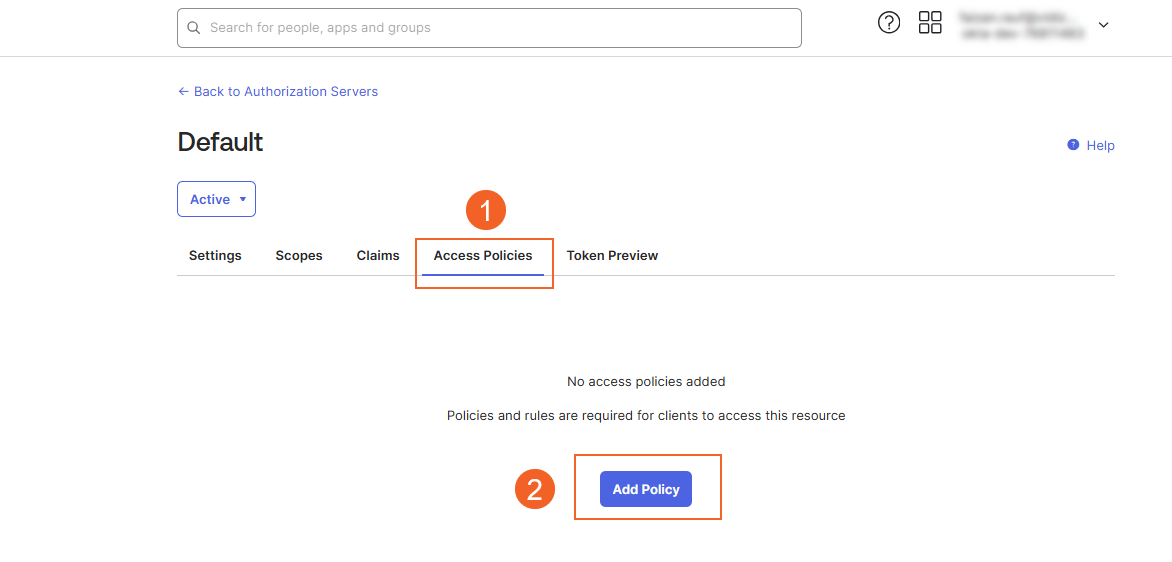
- Navigate to the Access Policies tab.
- Under the Access Policies tab, select Add New Access Policy.
-
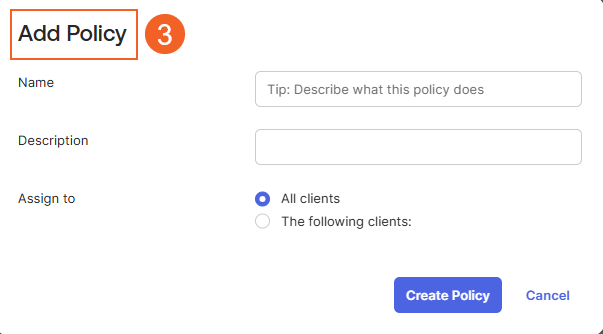
When the modal appears:
- Enter the Name and Description for the policy.
- Select the Assign To option based on your requirements.
- Select Create Policy to save your new policy.
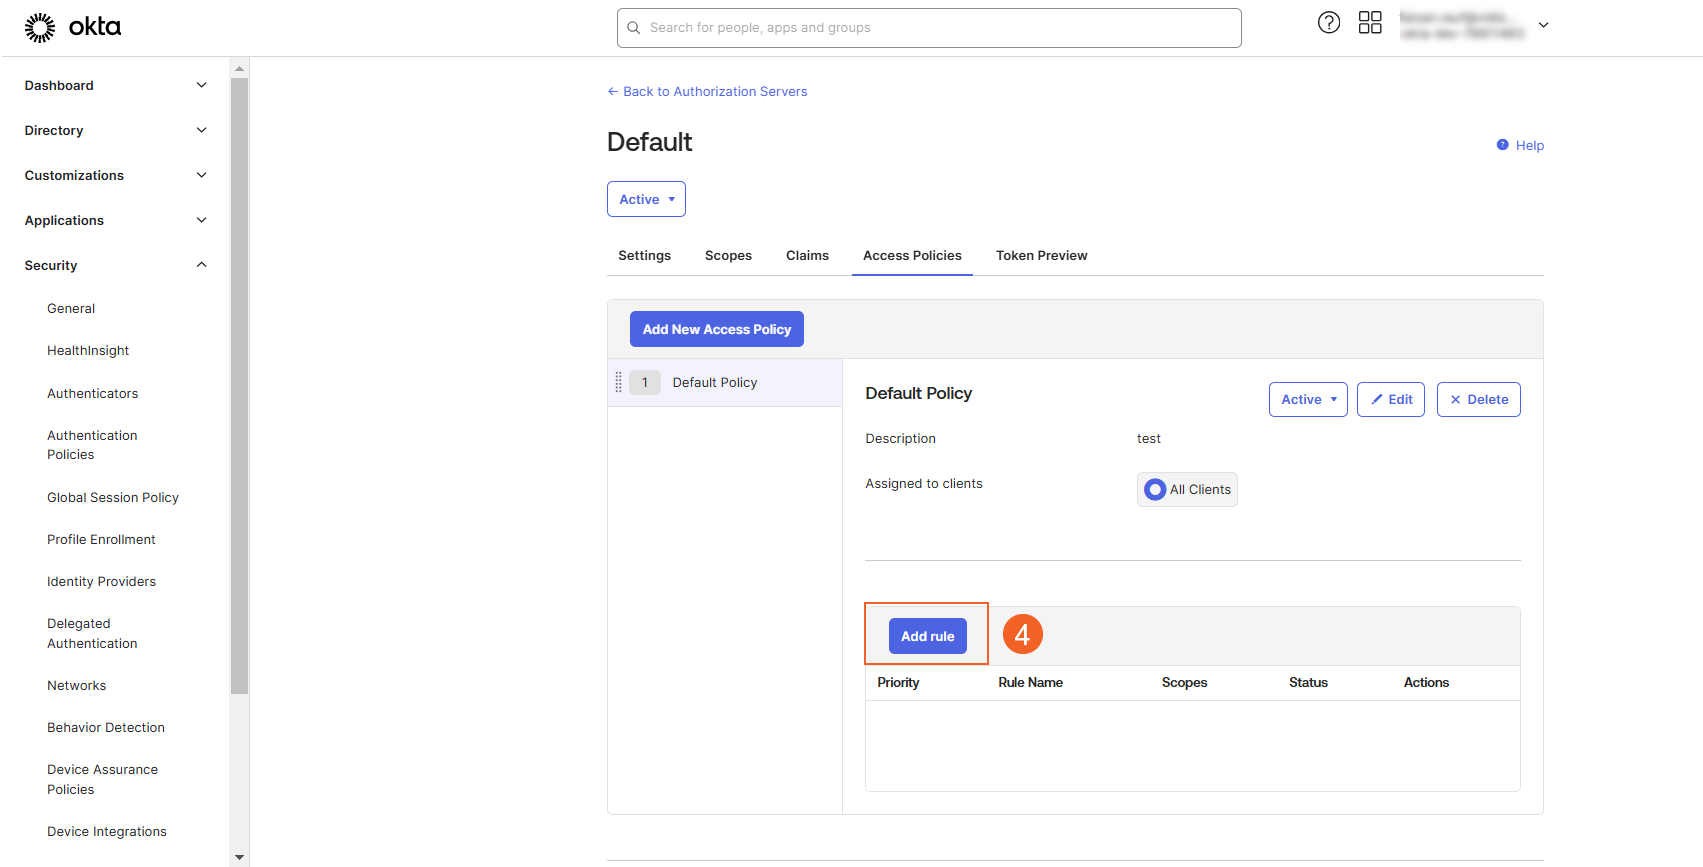
- If you need to define rules for this policy, select Add Rule.
-
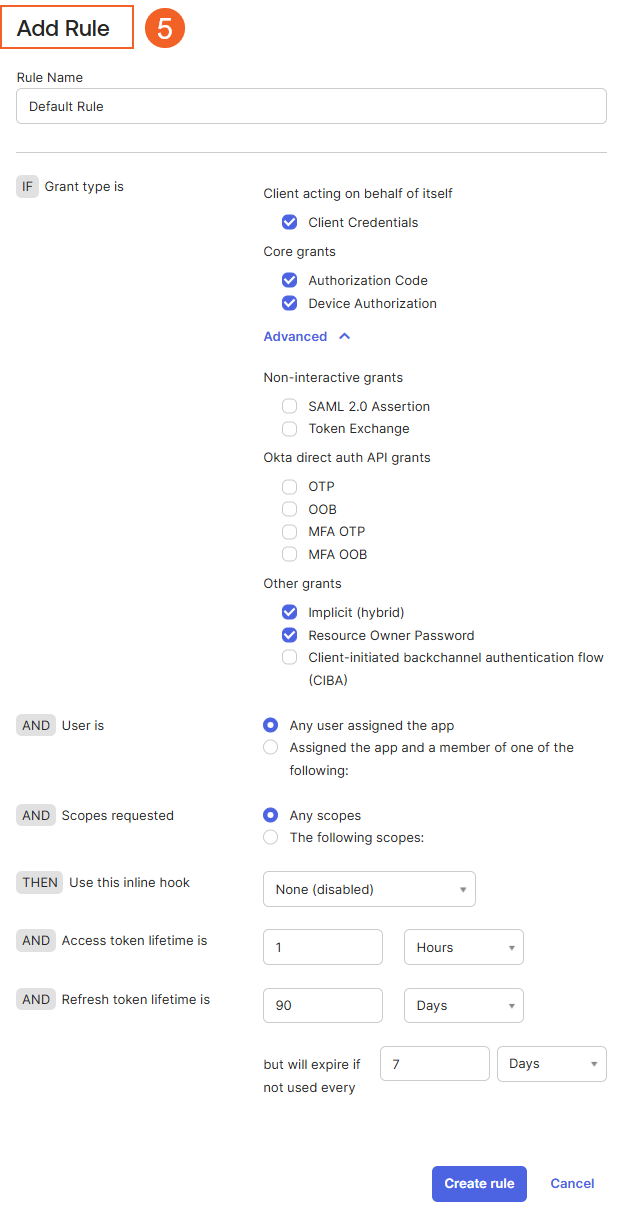
A modal will open for rule configuration:
- Select the options as required.
- If you are uncertain about specific settings, refer to the screenshot below.
- Select Create Rule to save the rule.
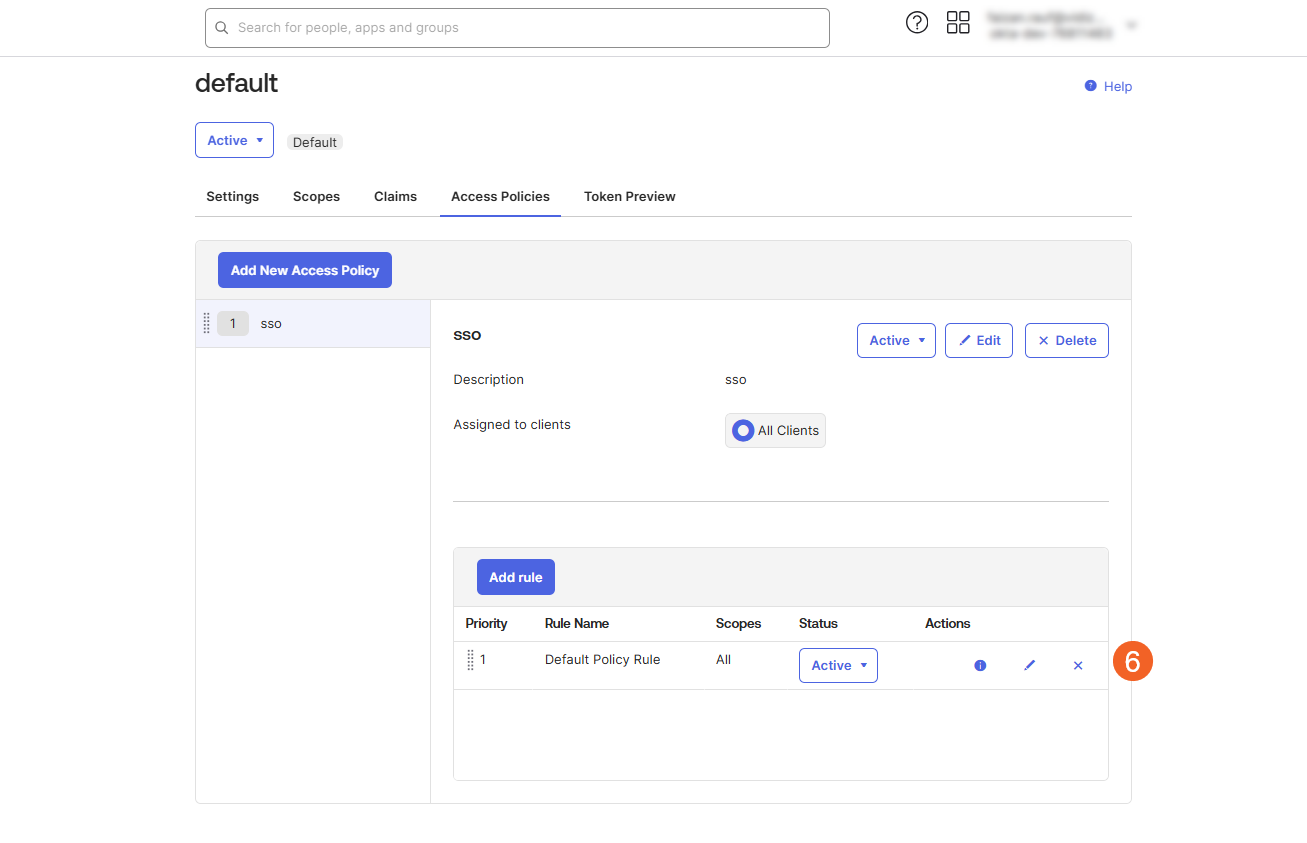
- Once saved, the created rule will appear under the Access Policies tab, associated with the respective policy.
Noting Parameters from Okta
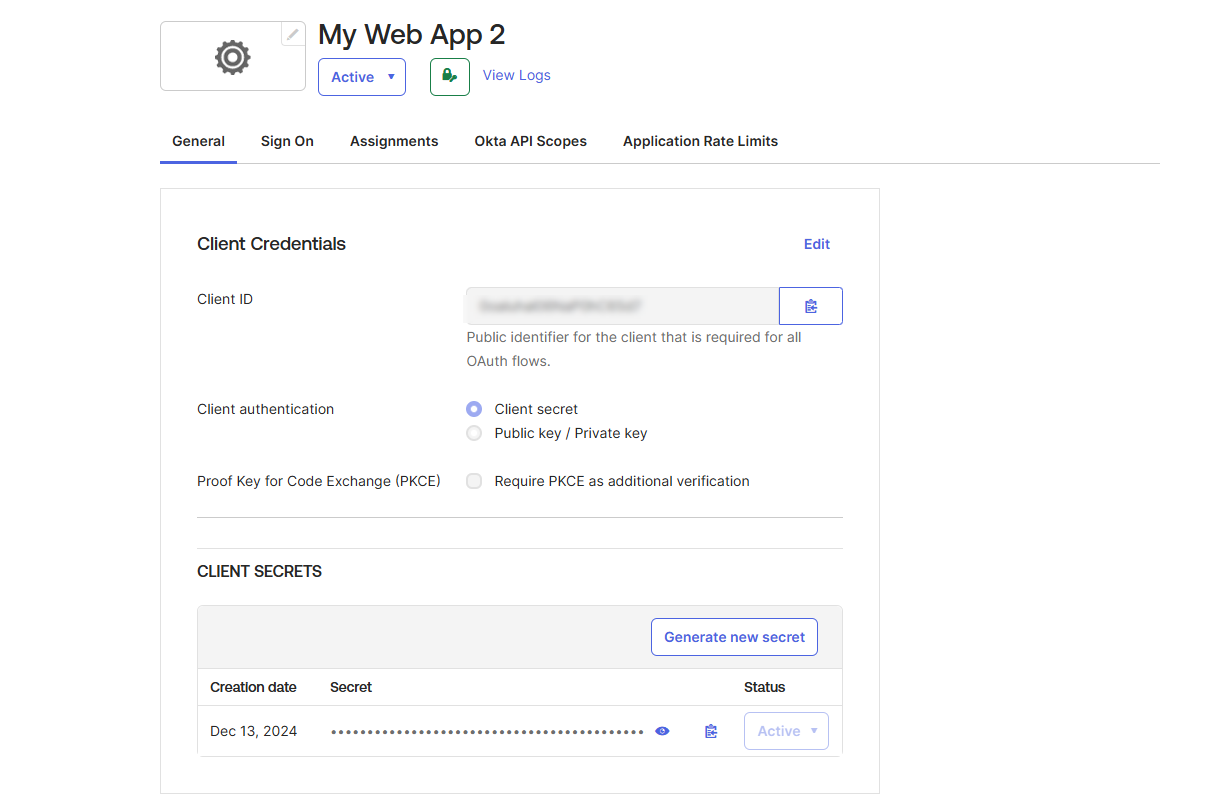
- Client ID and Client Secret:
- Navigate to the General tab of the created application.
- Locate the Client Credentials section and copy the Client ID and Client Secret.
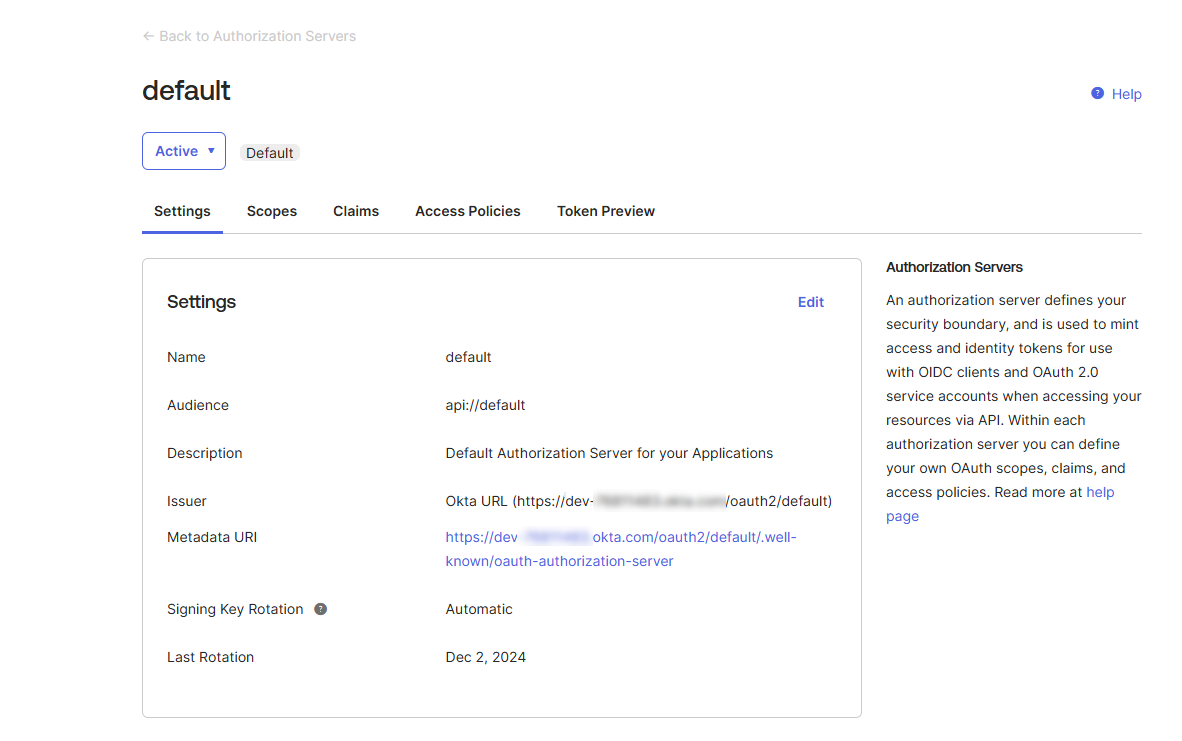
- Metadata URI:
- Go to Security > API.
- Under the Authorization Servers tab, find the Default Authorization Server and select Edit.
- From the Settings tab of the Default Authorization Server, locate and copy the Metadata URI.
Configuration in VIDIZMO
1. In VIDIZMO, select the menu icon in the top-left corner to open the navigation pane. 2. Expand the Admin section and select Portal Settings. 3. Go to Apps > Single Sign-On. 4. Select the settings icon on the Okta app. 5. In the settings dialog, enter the following:
- SSO Login Message Enter here the message that you want to display on your portal login screen for Okta login.
- SSO Login Button Label Text displayed on the login button.
- Client ID This is a unique identifier for the client application. Enter the Client ID you noted earlier from Okta during the creation of the application.
- Client Secret The client secret is used for accessing groups in your Identity Provider (IdP). Enter the Client Secret you noted earlier from Okta during the creation of the application.
- Meta Address
Enter the Metadata URI. If your Okta application is using:
- OIDC: The URL appears in this format:
https://<yourOktaDomain>/oauth2/default/.well-known/openid-configuration - OAuth: The URL appears in this format:
https://<yourOktaDomain>/oauth2/default/.well-known/oauth-authorization-server
- OIDC: The URL appears in this format:
NOTE: Refer to the Okta developer documentation for updated endpoint information.
- Requires HTTPS Metadata Select this checkbox to ensure HTTPS is required to get the metadata. When the request is handled for the first time, it tries to retrieve metadata from the authorization server (also called an authority or issuer). This metadata, or discovery document in OpenID Connect terminology, contains the public keys and other details needed to validate tokens.
- Force Login Select this option to redirect users directly to the Okta sign-in page. When unchecked, users sign in through your Portal's sign-in screen.
- Callback Path
Pre-configured to
/sso/signin-okta. Specifies the callback location where the authorization will be sent to your Portal. - Scope A space-delimited list of scopes. OpenID Connect uses scope values to specify what access privileges are being requested for access tokens. The scopes associated with access tokens determine which claims are available when they are used to access the OIDC /userinfo endpoint. The following scopes are supported: openid, profile, email, phone, groups etc.
- Response Type Specifies the response type for OIDC authentication. Any combination of code, token, and id_token is used and is an opaque value that can be used to redeem tokens from the token endpoint. In our example, we have used "code" type. The code is returned if the response_type includes code. The code has a lifetime of 60 seconds.
- Save Tokens API tokens have the same permissions as the user who creates them, and if the user permissions change, the API token permissions will also change.
- Get Claims From UserInfo Endpoint This option returns claims about the authenticated end user if the UserInfo endpoint claims need to be obtained implicitly.
- Attribute Mapping Attribute Mapping allows you to map your attributes with the IDP's attributes.
- CAL Select a Client Access License to assign to users who sign in through Okta SSO. When a user enters the Portal via Okta SSO, this CAL is assigned to them, granting the permissions associated with that CAL.
6. Select Save Changes to apply your settings. 7. Turn on the toggle for the Okta app to enable SSO.
NOTE: A notification will appear stating "Portal Information Updated Successfully."
Result
Navigate to the Portal's sign-in screen and you will see an option Login with Okta.